Merry Christmas y'all! So I've been missing in action via the blogosphere- you'll have to forgive me, my life has been IN-SANE lately. As most of you know my husband returned from deployment last month, I met him in Arkansas where we were stationed (I was in Florida with my mom for the duration of his deployment), we traveled to Chicago to spend Thanksgiving with my husband's family, we then returned to Arkansas to pack up our belongings and move to Panama City, FL- our new home! We spent a week finding a home, moving our things in and then we drove to Jacksonville, FL to spend the holidays with my family. 2 months, 5 cities, 3 states, no big deal. The good news is I HAVE a home now, I'm just not there currently, hehe. We'll be back and on our way to getting settled after the new year. So that's where I've been...

In other news, this really cool company "Better Oats" sent me some samples of their instant oatmeal. I was super excited because I love oatmeal, it's such an easy breakfast and it actually keeps you FULL. There's nothing worse than eating and being hungry 30 minutes later. Better Oats are great because they're made with wholesome, honest ingredients- you can read every ingredient on their box and know exactly what you're consuming. Love that. Here's some of the fab flavors they sent me:
You can't really read the flavors in the picture but (from left to right) they are: blueberry muffin, apple cinnamon, pomegranate, bare, & oatmeal raisin cookie (MY FAVE!). They also have ground flax in the mix for some extra fiber & nutrition. The other uhh-mazing thing about Better Oats? No measuring cup needed: you measure the water right in the same package the oatmeal came out of.

You just pour the oatmeal into your microwave-safe bowl, measure the water in the pouch, stir into the oatmeal & zap away. How cool is that? I'm a huge fan of using the least amount of dishes as possible, sayonara measuring cup! So after the holidays I'm going to make up a little goodie bag of some of these Better Oats to give away to a reader (and maybe a super cute bowl & spoon combo?!) so be on a look-out for that! For more information on Better Oats and to find a location near you where you can purchase them visit: www.BetterOats.com & you can "Like" them on Facebook here (they have COUPONS on the FB page!): https://www.facebook.com/BetterOats
ON TO THE RECIPE: These muffins are so yummy! Low- carb, high protein, easy to throw together, perfect little breakfast treat. I knew I wanted to use some of these Better Oats for a muffin recipe, my hubby asked for the Apple Cinnamon flavor- he loves anything apple! I added the pumpkin for added moisture (they're super light & fluffy!). These are a must try. Maybe a perfect Christmas Eve breakfast?!
Ingredients:
1 Cup Almond Flour
1 Cup Pumpkin Puree (100% pumpkin, no added sugar!)
1/4 Cup Almond Butter (or your choice of nut butter)
1/4 Cup Honey
2 Eggs
1 tsp. Baking Powder
1 tsp. Ground Cinnamon
1/2 tsp. Salt
2 Packages "Better Oats" Cinnamon Apple Instant Oatmeal
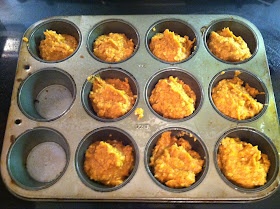
Step 1: Pre-heat oven to 350 degrees Fahrenheit, grease a muffin pan. Whisk together all of the ingredients except for the oats.
Step 2: Fold in oats, stir to combine.
Step 3: Fill muffin cups about 3/4 full with batter. Batter will be thick- that's okay!
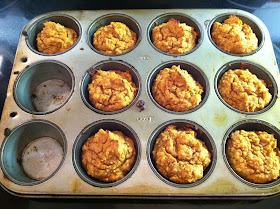
Step 4: Bake 20-25 minutes, or until a toothpick comes out clean.
ENJOY!
“This sponsorship is brought to you by Better Oats's whom we have partnered with for this promotion.”

A couple of weeks again my husband and I were browsing the bulk section at Whole Foods when I picked myself up a little snack- Almonds dipped in peanut butter & dark chocolate. Holy moleyyy they were delicious. I'm embarrassed to tell you how many I ate and in how little time, so we won't go in to details. I'll just say that they were uh-mazing and I knew I was going to have to find a way to replicate that flavor so that I didn't have to drive the 45 minutes out to Whole Foods to get my fix. That's how this bark was born. It's a quick and easy little recipe that's super high in protein, gluten- free & dairy- free and UMMM there's chocolate. Need I say more? I made this the day before our road trip to Illinois and packed some pieces up in mason jars for the road. Perfect road trip food! Would also be a great Christmas treat to give out to friends, or to keep in the house for family! Just because it's Christmas doesn't mean you need to look like Santa ;)
Ingredients:
1 Cup Almond Butter (I used Justin's Maple Almond Butter)
1 Tbsp. Agave Nectar (You may not need this, I needed it to thin out the almond butter because mine was so thick it wouldn't melt enough)
1 Cup Unsalted Raw Almonds
1 Cup Enjoy Life Mini Chocolate Chips
Step 1: Measure out 1 cup of almond butter into a glass measuring cup or a microwave safe dish. Microwave the almond butter for a minute and stir.
Step 2: Mine wasn't quite thin enough (you want it melty enough to coat the almonds thoroughly) so I added 1 Tbsp. of agave nectar to the almond butter and stirred until it was liquid-y enough to coat the nuts. This is all going to depend on the kind of nut butter you use- just experiment with microwaving and agave or honey until is thin enough.
Step 3: Put your almonds in to a glass bowl and pour the melted almond butter over top. Stir to coat the nuts thoroughly. Cover and freeze for an hour.
Step 4: Measure your chocolate chips into a microwave safe dish and microwave for 30 seconds at a time until melted completely, stirring between 30 second increments.
Step 5: Pour melted chocolate over almond- almond butter mixture and stir to combine thoroughly.
Step 6: Pour bark mixture onto a lined baking sheet and flatten with a spoon.
Step 7: Pop bark into the freezer and freeze for an hour until the bark has hardened completely. When your bark has hardened completely, pull it out of the freezer and break into pieces. Keep in air-tight containers and enjoy!

Happy Saturday! I hope everyone had a fabulous Thanksgiving and spent lots of time being grateful and just ya know- full. :-) We had the best Thanksgiving in Illinois with my husband's family. A really, really good day with lots of really good food! We did a little bit of Black Friday shopping yesterday afternoon, didn't do the wake up at 4 am thing just went later on and still found some good deals. Today is all about football (GO NOLES!) and spending some more family time while we're still in Illinois! It is freezing here. Like, literally it's 29 degrees. Too chilly for this Florida girl! I see fuzzy socks and warm beverages in my future...
Went out to dinner with the hubbs & some friends last week and I had this "stuffed chicken" dish. It was meh- okay. The "stuffed" portion of the chicken was supposed to be cheese & spinach but it was really lacking. Might as well have given me a plain grilled chicken breast. So I decided to try my own spin on the stuffed chicken and put some actual filling into mine :) Turned out SO yummy. It was a pretty simple meal all together, but looked super impressive. Don't you love dinners like that? I always like it when it looks like I put in a ton of work, but really I got off pretty easy. ;) Your family doesn't need to know that though! Take the praise and adoration, and eat your chicken too.

I used spinach & mozzarella because that's what I had on my mind, and in my refrigerator. You could use this same basic chicken stuffing idea though and use a different combo of flavors. Why not try some sun dried tomatoes, feta cheese, and chopped olives for a greek stuffed chicken? Or some pepper jack cheese and sliced jalapenos for a spanish version? Yum.
Ingredients: (3 LARGE servings)
3 chicken breasts
1 Tablespoon Olive Oil
1 teaspoon garlic powder
1/2 teaspoon cracked black pepper
About 2 cups of baby spinach
A couple of slices of good mozzarella cheese (I used 5 slices)
3 teaspoons seasoned salt
Unwaxed Un-flavored Dental Floss (to hold your chickens together)
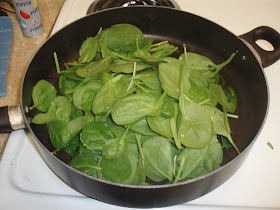
Step 1: Pre-heat oven to 375 degrees Fahrenheit. In a medium sized skillet heat olive oil on medium heat. Add your spinach and season with garlic powder and black pepper.
Step 2: Cook spinach down until it's all wilted. Leave heat on the pan to sear the chicken after it's stuffed.
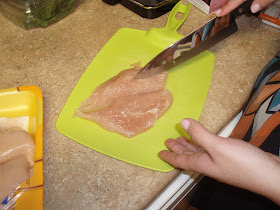
Step 3: You're going to need to "butterfly" your chicken breasts. To do this, use a very sharp knife to cut down the center of the chicken breast, lengthwise, almost all the way through but not quite. Making a little bed for your stuffing mixture.
Step 4: Place cheese into opened chicken breast.
Step 5: Top cheese with 1/3 of your spinach mixture.
Step 6: Close your chicken breast over the cheese & spinach.
Step 7: Using your un-waxed, un-flavored dental floss tie together your new little chicken bundle. I used about 3 strips per breast.
Step 8: Season the outside of the chicken breast with seasoned salt.
Step 9: Place your chicken breasts into the hot skillet, not to cook them all the way through but just to sear the outsides for a minute or two until they get golden brown and pretty.
Step 10: Remove chicken breasts from skillet and place them in a oven- safe dish. Cook for 15- 20 minutes or until chicken is cooked through and cheese is melted.
ENJOY!
Have a good weekend! I'll be back next week starting with some holiday treats... ohh yeah it's that time of year! :-D

Happy Thanksgiving Eve y'all! I don't have a new recipe for you today, let's be real- you've got more Thanksgiving recipes than you can possibly cook already I'm sure. I wanted to just write a little blurb about what I'm really thankful for this year. 2012 has by NO means been an easy or overly wonderful year for me. It's been hard, lonely, challenging, and even displaced at times. But 2012 also brought great reflection to my own personal self and helped me really discover who I want to be. Being a military wife can make you feel like you have absolutely no control over your own personal life. My husband tells me when he leaves and for how long, where we'll live for undetermined amounts of time, basically the United States Air Force has full control and I'm just along for the ride. I found myself at times just being my husband's wife, but I often forgot about being ME. It sounds a little silly, how can you lose your own self? But it happened. I lived for my husband but I feel like along the way I stopped living for me and what I truly wanted. When he deployed I found myself totally lost, when the one person you center your life around is gone you're kinda forced to get your own self together again. I started this blog just to share some of my recipes with my faraway friends (when you're military ALL of your friends are faraway at some point) and family. I NEVER expected people from all of the country to find this little site and read my recipes too. Then I logged on one day and saw that a whole ton of people had been reading. WHO ARE THESE PEOPLE? That was my initial thought, and then I was super excited! Writing has always been a passion of mine, and I couldn't believe people were actually reading what little 'ol me had been writing. Creating new recipes and writing about them became very therapeautic for me. I had something to actually do, something that inspired me and that I was passionate about. I found ME again. The beautiful thing about this little site is that I can write anywhere! For example, I started blogging in Florida over the Summer, I have been writing in Arkansas for the past few weeks, and I am writing to you right now from outside of Chicago, Illinois! Along the road of blogging and cooking and getting back to everything I loved about myself I've found the desire to take much better care of myself- to eat good nutritional foods and to excercise regularly. Those are things I've lacked for YEARS. I feel better than I can remember, I feel like I am taking care of myself first, not just my husband, and you know what? I think he likes me a lot more for it. So what I'm trying to say (far too long winded-ly) is that I'm thankful for YOU, the person reading this right now. I'm thankful for every person who's read any single word I've written on this site. I'm thankful for the kind words people I've never met wrote me while my husband was deployed. I'm thankful for finding something that brings me so much happiness that it inspires me to be a better me.
I hope you have a wonderful holiday and that you also remember to take the time to think about the things that you're thankful for--- and THANK YOU for reading. :)
xoxox
Brittany
A saturday post?! Have I just recently gotten super motivated or what? Well, kinda. Also we're leaving Tuesday for Chicago for the holiday and I'm trying to get all my recipes posted before then :-) Working on a Saturday is super distracting for me though, FOOTBALL IS ON! Luckily my Seminoles already won a blow-out and wrapped up their conference this morning so I have a little downtime before the big games tonight to do a little blogging. Have I talked about my sports obsession before? It's a little out of control. Growing up ESPN was on in my house 24/7 the way that Fox News is in Dr.'s offices. I don't usually think of the year as divided into seasons as much as I think of the sports seasons. Spring is baseball (beginning of anyways), summer continues baseball, Fall is football (YES!), and winter is basketball. Duh. Doesn't everyone think that way? Football season is the most wonderful time of the year, forget Christmas. As mentioned above Florida State football is my college team, and my hometown NFL team would be the Jacksonville Jaguars but they're really not worth mentioning this year. I also have my own fantasy football team, The Lady Bears who are having a pretty okay 5-5 season so far and still have a nice little shot at the playoffs. When it comes to basketball, I root for the Boston Celtics and in NCAA I always pull for FSU. Baseball is probably what I grew up on the MOST and my heart will always be with the Boston Red Sox. Love. Them. Now that I've filled your head with sports nonsense that I'm sure you don't really care about let's talk about pie.

Alright so the pictures kinda suck for this recipe. What had happened was.... this was the very last recipe I made during my "Fakesgiving" feast and I was tired and lazy and I might have had a couple glasses of champagne... so the pictures aren't great. But the recipe is super delish and I would make this not just for Thanksgiving but anytime I wanted a "treat" that really isn't bad for you at all. Sweetened with just 100% maple syrup and containing lots of good fats from coconut milk (Fat isn't bad for you! Just trans fats are... get your fats from natural sources:)) this pie is actually pretty darn good for you. Make some fresh whipped cream from some heavy cream (I meant to do this, but like I said I was tired & lazy) and you'll be in crust-less pie heaven. :-)
Ingredients:
1 14- oz can 100% pumpkin
1 Tablespoon Pumpkin Pie Spice
1/2 teaspoon salt
3 Eggs
1/4 Cup 100% pure maple syrup
1 tsp pure vanilla extract
1 14-oz can full fat coconut milk (found in Asian foods aisle!)
Step 1: Pre-heat oven to 350 degrees Fahrenheit. Whisk together Pumpkin, pumpkin pie spice, salt, and eggs until fully combined.
Step 2: Add maple syrup, vanilla, and coconut milk and whisk together.
Step 3: Pour into greased pie pan. I didn't have one, so I used an 8x8 brownie pan. Sue me.
Step 4: Now because this is more of a custard than a real "pie" because of lack of crust we want to gently bake it so we need to create a water bath. You'll need a casserole dish type pan large enough for your pie pan to fit into. Fill that casserole dish with about an inch of water, enough to go up about half the side of the pie pan but not enough so that the water will actually get in your pie.
Step 5: CAREFULLY put your pans into the oven and bake 50 min- an hour or until the center is cooked through. Let rest about 5 minutes before you cut into it.
Sorry again for the less-than-stellar pictures but it did taste really good, I swear! Hope everybody is having a great weekend!


