Happy Saturday! I hope everyone had a fabulous Thanksgiving and spent lots of time being grateful and just ya know- full. :-) We had the best Thanksgiving in Illinois with my husband's family. A really, really good day with lots of really good food! We did a little bit of Black Friday shopping yesterday afternoon, didn't do the wake up at 4 am thing just went later on and still found some good deals. Today is all about football (GO NOLES!) and spending some more family time while we're still in Illinois! It is freezing here. Like, literally it's 29 degrees. Too chilly for this Florida girl! I see fuzzy socks and warm beverages in my future...
Went out to dinner with the hubbs & some friends last week and I had this "stuffed chicken" dish. It was meh- okay. The "stuffed" portion of the chicken was supposed to be cheese & spinach but it was really lacking. Might as well have given me a plain grilled chicken breast. So I decided to try my own spin on the stuffed chicken and put some actual filling into mine :) Turned out SO yummy. It was a pretty simple meal all together, but looked super impressive. Don't you love dinners like that? I always like it when it looks like I put in a ton of work, but really I got off pretty easy. ;) Your family doesn't need to know that though! Take the praise and adoration, and eat your chicken too.

I used spinach & mozzarella because that's what I had on my mind, and in my refrigerator. You could use this same basic chicken stuffing idea though and use a different combo of flavors. Why not try some sun dried tomatoes, feta cheese, and chopped olives for a greek stuffed chicken? Or some pepper jack cheese and sliced jalapenos for a spanish version? Yum.
Ingredients: (3 LARGE servings)
3 chicken breasts
1 Tablespoon Olive Oil
1 teaspoon garlic powder
1/2 teaspoon cracked black pepper
About 2 cups of baby spinach
A couple of slices of good mozzarella cheese (I used 5 slices)
3 teaspoons seasoned salt
Unwaxed Un-flavored Dental Floss (to hold your chickens together)
Step 1: Pre-heat oven to 375 degrees Fahrenheit. In a medium sized skillet heat olive oil on medium heat. Add your spinach and season with garlic powder and black pepper.
Step 2: Cook spinach down until it's all wilted. Leave heat on the pan to sear the chicken after it's stuffed.
Step 3: You're going to need to "butterfly" your chicken breasts. To do this, use a very sharp knife to cut down the center of the chicken breast, lengthwise, almost all the way through but not quite. Making a little bed for your stuffing mixture.
Step 4: Place cheese into opened chicken breast.
Step 5: Top cheese with 1/3 of your spinach mixture.
Step 6: Close your chicken breast over the cheese & spinach.
Step 7: Using your un-waxed, un-flavored dental floss tie together your new little chicken bundle. I used about 3 strips per breast.
Step 8: Season the outside of the chicken breast with seasoned salt.
Step 9: Place your chicken breasts into the hot skillet, not to cook them all the way through but just to sear the outsides for a minute or two until they get golden brown and pretty.
Step 10: Remove chicken breasts from skillet and place them in a oven- safe dish. Cook for 15- 20 minutes or until chicken is cooked through and cheese is melted.
ENJOY!
Have a good weekend! I'll be back next week starting with some holiday treats... ohh yeah it's that time of year! :-D

Happy Thanksgiving Eve y'all! I don't have a new recipe for you today, let's be real- you've got more Thanksgiving recipes than you can possibly cook already I'm sure. I wanted to just write a little blurb about what I'm really thankful for this year. 2012 has by NO means been an easy or overly wonderful year for me. It's been hard, lonely, challenging, and even displaced at times. But 2012 also brought great reflection to my own personal self and helped me really discover who I want to be. Being a military wife can make you feel like you have absolutely no control over your own personal life. My husband tells me when he leaves and for how long, where we'll live for undetermined amounts of time, basically the United States Air Force has full control and I'm just along for the ride. I found myself at times just being my husband's wife, but I often forgot about being ME. It sounds a little silly, how can you lose your own self? But it happened. I lived for my husband but I feel like along the way I stopped living for me and what I truly wanted. When he deployed I found myself totally lost, when the one person you center your life around is gone you're kinda forced to get your own self together again. I started this blog just to share some of my recipes with my faraway friends (when you're military ALL of your friends are faraway at some point) and family. I NEVER expected people from all of the country to find this little site and read my recipes too. Then I logged on one day and saw that a whole ton of people had been reading. WHO ARE THESE PEOPLE? That was my initial thought, and then I was super excited! Writing has always been a passion of mine, and I couldn't believe people were actually reading what little 'ol me had been writing. Creating new recipes and writing about them became very therapeautic for me. I had something to actually do, something that inspired me and that I was passionate about. I found ME again. The beautiful thing about this little site is that I can write anywhere! For example, I started blogging in Florida over the Summer, I have been writing in Arkansas for the past few weeks, and I am writing to you right now from outside of Chicago, Illinois! Along the road of blogging and cooking and getting back to everything I loved about myself I've found the desire to take much better care of myself- to eat good nutritional foods and to excercise regularly. Those are things I've lacked for YEARS. I feel better than I can remember, I feel like I am taking care of myself first, not just my husband, and you know what? I think he likes me a lot more for it. So what I'm trying to say (far too long winded-ly) is that I'm thankful for YOU, the person reading this right now. I'm thankful for every person who's read any single word I've written on this site. I'm thankful for the kind words people I've never met wrote me while my husband was deployed. I'm thankful for finding something that brings me so much happiness that it inspires me to be a better me.
I hope you have a wonderful holiday and that you also remember to take the time to think about the things that you're thankful for--- and THANK YOU for reading. :)
xoxox
Brittany
A saturday post?! Have I just recently gotten super motivated or what? Well, kinda. Also we're leaving Tuesday for Chicago for the holiday and I'm trying to get all my recipes posted before then :-) Working on a Saturday is super distracting for me though, FOOTBALL IS ON! Luckily my Seminoles already won a blow-out and wrapped up their conference this morning so I have a little downtime before the big games tonight to do a little blogging. Have I talked about my sports obsession before? It's a little out of control. Growing up ESPN was on in my house 24/7 the way that Fox News is in Dr.'s offices. I don't usually think of the year as divided into seasons as much as I think of the sports seasons. Spring is baseball (beginning of anyways), summer continues baseball, Fall is football (YES!), and winter is basketball. Duh. Doesn't everyone think that way? Football season is the most wonderful time of the year, forget Christmas. As mentioned above Florida State football is my college team, and my hometown NFL team would be the Jacksonville Jaguars but they're really not worth mentioning this year. I also have my own fantasy football team, The Lady Bears who are having a pretty okay 5-5 season so far and still have a nice little shot at the playoffs. When it comes to basketball, I root for the Boston Celtics and in NCAA I always pull for FSU. Baseball is probably what I grew up on the MOST and my heart will always be with the Boston Red Sox. Love. Them. Now that I've filled your head with sports nonsense that I'm sure you don't really care about let's talk about pie.

Alright so the pictures kinda suck for this recipe. What had happened was.... this was the very last recipe I made during my "Fakesgiving" feast and I was tired and lazy and I might have had a couple glasses of champagne... so the pictures aren't great. But the recipe is super delish and I would make this not just for Thanksgiving but anytime I wanted a "treat" that really isn't bad for you at all. Sweetened with just 100% maple syrup and containing lots of good fats from coconut milk (Fat isn't bad for you! Just trans fats are... get your fats from natural sources:)) this pie is actually pretty darn good for you. Make some fresh whipped cream from some heavy cream (I meant to do this, but like I said I was tired & lazy) and you'll be in crust-less pie heaven. :-)
Ingredients:
1 14- oz can 100% pumpkin
1 Tablespoon Pumpkin Pie Spice
1/2 teaspoon salt
3 Eggs
1/4 Cup 100% pure maple syrup
1 tsp pure vanilla extract
1 14-oz can full fat coconut milk (found in Asian foods aisle!)
Step 1: Pre-heat oven to 350 degrees Fahrenheit. Whisk together Pumpkin, pumpkin pie spice, salt, and eggs until fully combined.
Step 2: Add maple syrup, vanilla, and coconut milk and whisk together.
Step 3: Pour into greased pie pan. I didn't have one, so I used an 8x8 brownie pan. Sue me.
Step 4: Now because this is more of a custard than a real "pie" because of lack of crust we want to gently bake it so we need to create a water bath. You'll need a casserole dish type pan large enough for your pie pan to fit into. Fill that casserole dish with about an inch of water, enough to go up about half the side of the pie pan but not enough so that the water will actually get in your pie.
Step 5: CAREFULLY put your pans into the oven and bake 50 min- an hour or until the center is cooked through. Let rest about 5 minutes before you cut into it.
Sorry again for the less-than-stellar pictures but it did taste really good, I swear! Hope everybody is having a great weekend!
Happy Friday-eve! This is my 4th post in a row this week, whoa. I went from being MIA to bombarding you with all kinds of Thanksgiving goodness. Thanksgiving is just 1 short week away though! It is time to get that menu plan locked and loaded. So why should these biscuits make your Thanksgiving menu? Well first (and most importantly) they're freaking delicious. Second, they have bacon in them. Do I really need a third? I said bacon. But if you really need a third, it's a different, unexpected way to do sweet potatoes. I know I talk about (and cook) sweet potatoes ALL THE TIME, and that's mostly because I just love them but they're also nutritional powerhouses! Super good stuff yo. So eat your sweet potatoes. Like this. Or like any of the other tons of ways I've mentioned on this blog.

This is a Paleo OMG recipe (PaleOMG.com, she's hilarious & makes amazing food!) and the MINUTE it arrived in my in-box I knew I would be making them. They combine my hubby's 2 favorite things, sweet potatoes & bacon. Sounds like a weird combo, tastes delicious. TRUST ME. I added a little cheese and that was a great addition but they would be fab without as well. Just as great with breakfast as dinner too. These little guys are versatile! Check out Juli's original recipe here: http://paleomg.com/thanksgiving-side-dish-bacon-chive-sweet-potato-biscuits/
Ingredients:
2 sweet potatoes, cooked & peeled (I just zapped mine in the microwave for 10 min)
3 Tablespoons coconut flour (I would think any kind of flour would work though...)
3 eggs, whisked
8 strips of bacon, cooked & crumbled
leftover bacon fat from cooked bacon
4 Tablespoons chopped green onions
1 teaspoon baking powder
1 teaspoon garlic powder
salt & pepper to taste
(optional) 1/4 cup shredded cheese
Step 1: Pre-heat oven to 375 degrees Fahrenheit. Grease a baking sheet. Mash your cooked & peeled sweet potatoes in a bowl (I just used a fork, mine were super soft).
Step 2: Add flour and stir to combine.
Step 3: Add eggs and stir to combine.
Step 4: Add bacon, bacon fat, green onions, baking powder, garlic powder, salt & pepper, and cheese (if desired) and stir to combine.
Step 5: Drop biscuits by rounded spoonfuls onto your baking sheet. Bake for 25-30 minutes, or until golden brown on top and cooked through.
ENJOY :-)
I am super excited to share this recipe with you today, mainly because it is pretty much the easiest recipe of all time. I used frozen cauliflower so there isn't even any veggie chopping involved. Just boil the veggies, drain, mash, add butter/garlic/cheese/etc, EAT. The whole process took me maybe 10 minutes. That's it. I knew I wanted to have mashed cauliflower in the place of mashed potatoes for our "Fakesgiving" feast but I knew that would be a hard sell to my mashed potato loving friends. So I did what any good friend would do- I lied. I told them that the mashed cauliflower was in fact mashed potatoes. I didn't tell them the truth until the bowl was scraped clean. Is it so wrong that I wanted my friends to get all the benefits of healthy cauliflower? Nope, and when I told them they were a little shocked. I say a little, because they read my blog and they know I'm trying to keep everything healthy so they were expecting trickery, but they still enjoyed every bite. My friend Ashley told me that she suspected that cauliflower was added to the "mashed potatoes" but she never would have guessed that it was straight up cauliflower only, no potatoes at all. I definitely recommend you also try the little white mashed potato/ cauliflower lie on your family :)

And you're going to have to forgive me for lack of pictures on this post, I did have 5 different recipes going on in the kitchen at the same time and it seems the photographing of the EASIEST one fell through the cracks. Of course. I'll do my best to give really good descriptions :)
Ingredients: (Served 6)
2 (16 oz.) bags frozen cauliflower florets
1/2 stick unsalted grassfed butter
2 garlic cloves, minced
1 teaspoon seasoned salt
1 teaspoon freshly ground black pepper
(optional) 1/4 good quality shredded cheese
Step 1: Put your frozen cauliflower in a pot and add enough water to cover all the veggies completely.
Step 2: Put the pot on a burner on high heat and bring water to a boil, then decrease heat to medium high and let cook for about 5 minutes or until florets are fork tender.
Step 3: Drain cauliflower. Add the florets to a bowl for mashing, or a food processor, or like me a high quality blender!
Step 4: Process cauliflower until smooth (or mash until smooth). Add butter, garlic, seasonings, and cheese, process until all combined. SERVE! :)
Today is day 2 of Thanksgiving recipes! Wahoo! And today's recipe happens to be my very favorite one that I am sharing all week. Just by a lil bit though, they're all really good ;). Have you ever made butternut squash before? I had not, until I made this one. I was always super intimidated by the thought of peeling and chopping a squash. It really wasn't that bad, it did take some elbow grease but I figured if I was about to stuff myself with turkey and fixins' a little cardio during the prep was kinda a bonus. I had eaten butternut squash previously, but never prepared it myself so I knew that flavor I was dealing with and I wanted to use pretty much the same spices that I use in my Sweet & Spicy Sweet Potato Wedges and just sub 100% maple syrup for the brown sugar to keep it paleo-ish. The flavorings were SPOT ON. I could have eaten an entire plate of this squash, but when I went back for seconds they were GONE. My friends who I was feeding that night are not particularly fond of vegetables either, and they inhaled these. They would make a perfect side dish for your Thanksgiving feast, they're more elegant than sweet potatoes topped with chemical-laden marshmallows and you'll be secretly sneaking in a bunch of Vitamin A and nutrients into your guests ;) Win- win!

I figured some of y'all may be scared of squash chopping like I was, so I took step-by-step pictures so I could show you how easy it was! You just need a good, sharp knife and a vegetable peeler! PS: you MAY be able to find fresh, pre-chopped butternut squash at your local grocery store- I saw some @ Whole Foods the other day and considered buying it but I felt like that was cheating and it was $10 for just over a pound. My squash was $1.30 at the commissary and I feel like the chopping effort was worth me saving $8.70. You may be able to find some pre-chopped squash that is worth the price though!
Ingredients:
1 Butternut Squash
Enough olive oil to coat completely, I used about 2 Tablespoons
1/4 Cup 100% Maple Syrup
2 teaspoons Chili Powder
1 teaspoon Paprika
1 teaspoon Pumpkin Pie Spice
1/2 teaspoon Salt
1/4 teaspoon Cayenne Pepper
Step 1: Pre-heat oven to 375 degrees Fahrenheit. Line a baking sheet with aluminum foil. Take your butternut squash out and prepare to chop.
 |
| My Gourd. |
Step 2: Chop the ends off of the squash, about an inch from the top and an inch from the bottom.
Step 3: Using a vegetable peeler, peel off the hard outer skin revealing the dark orange flesh underneath.
Step 4: Slice your squash in half, lengthwise (or "hot dog style" as we called it in kindergarten...)
Step 5: Using a spoon or melon baller scoop out the seeds and stringy flesh from the centers.
Step 6: Now you're done with the squash prep (It wasn't THAT bad was it?!) just dice those babies up and throw the wedges into a bowl for seasonings.
Step 7: Toss with wedges with olive oil and maple syrup, making sure they are all completely coated!
Step 8: Add all seasonings and stir to coat.
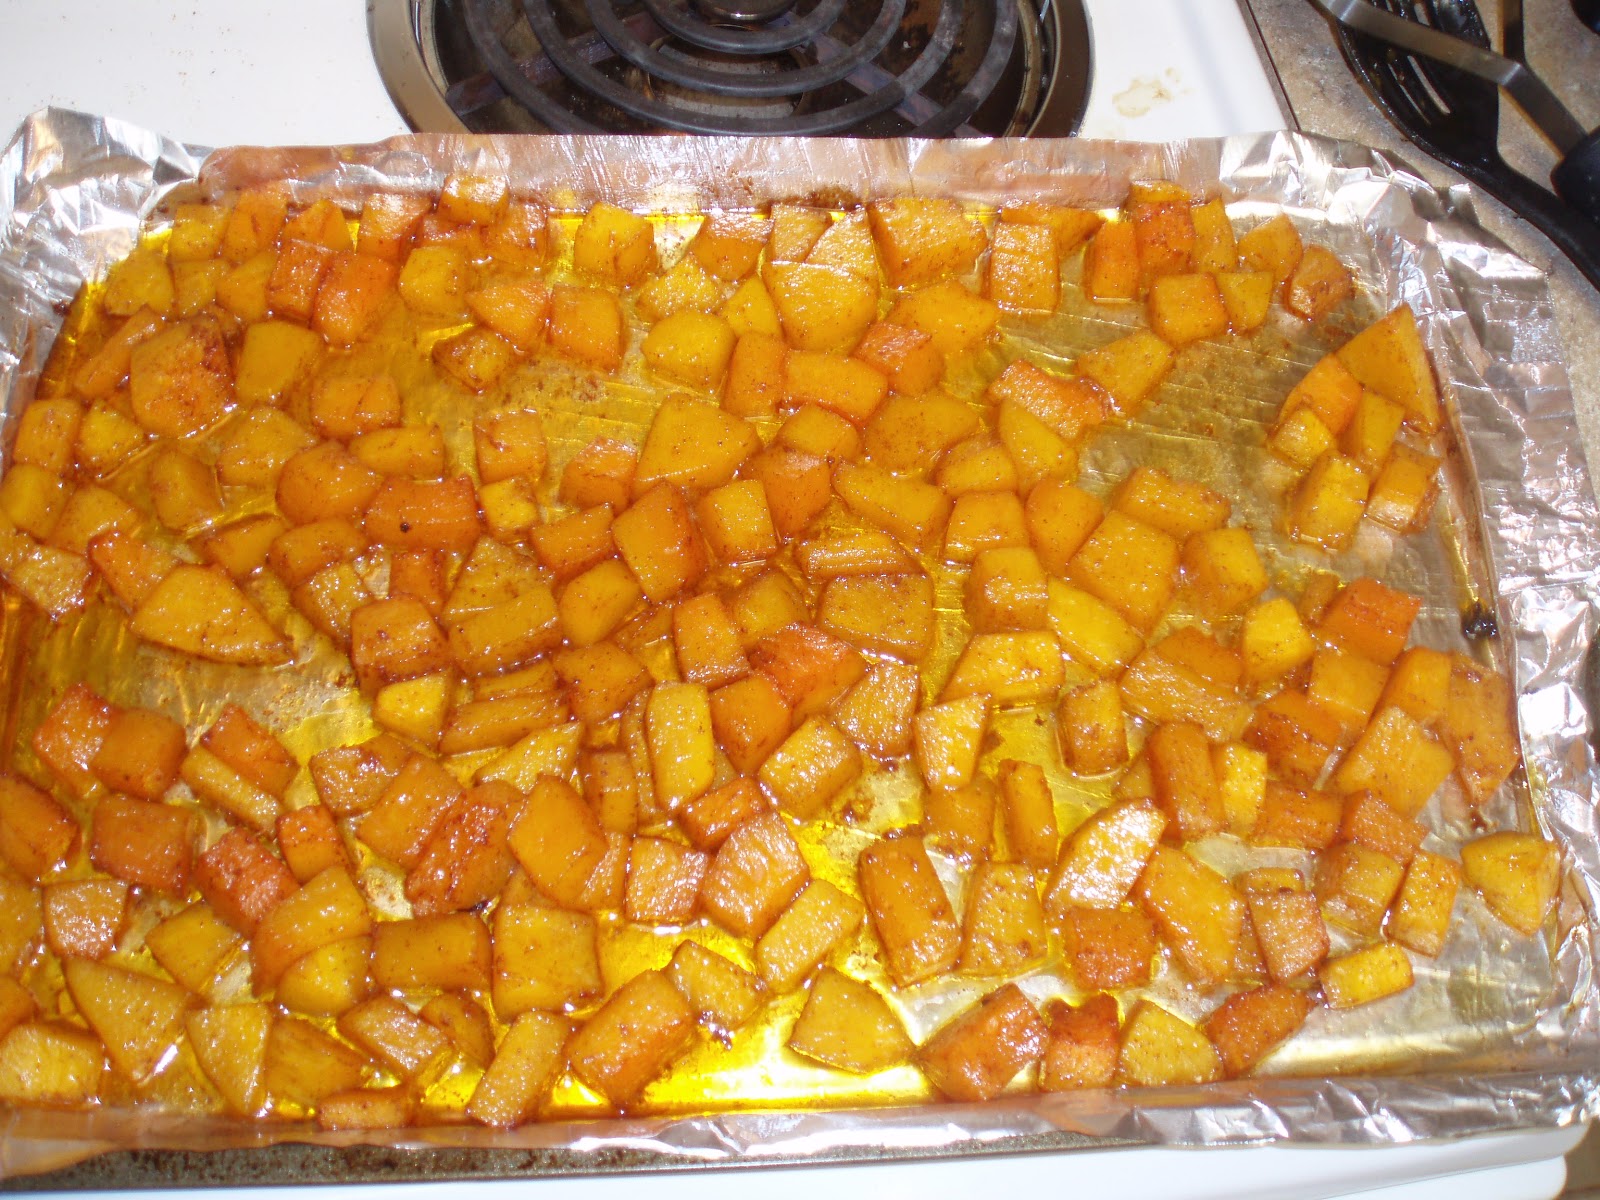
Step 9: Spread in an even layer on your lined baking sheet and bake for 20-25 minutes or until "fork tender" (stick your fork in, they're soft-ish- like when you know your potatoes are ready to mash)
ENJOY! And don't forget to hoard some for yourself, they go fast! :-)