Monday, June 25, 2012

Sweet & Spicy Sweet Potato Wedges :-)

One night last year my dear husband came home from work bursting with good news- Sweet potatoes are crazy good for you and he wanted me to make some for him- PRONTO! Now, I've know this good news about sweet potatoes for awhile, they are rich in complex carbohydrates, fiber, beta carotene, vitamin a, vitamin c, and vitamin b. Very good for you. However, the only way I'd ever eaten them was smothered in marshmallows during the holidays. Not very good for you. So here was my challenge, to come up with a way to serve my loving husband this super food in a super healthy manner. Challenge accepted. 

This resulted in a multitude of different trials and errors in the kitchen. My first was a very botched attempt at sweet potato fries that we both hated and ended up throwing away. From there it got better, we realized we really enjoyed the contrast of spicy & sweet, we liked the skin on, and we liked them in wedges. When I finally reached the final recipe conclusion- it was sweet sweet success (pun intended:)) These are a staple in my house. They're crispy, sweet, a little spicy, healthy, pretty to look at it, they're just kindof everything. :-) You can make them spicier if you like spicy food- If I'm making this for Nick & I, I generally use about a 1/2 tsp of cayenne pepper- but I used less because my fam isn't so fond of the spicy! Enjoy:-)

Ingredients:
2 similar sized sweet potatoes, washed and cut into wedges skin on (You can remove skin if you must... but it's full of nutrients!)
A couple of Tablespoons of Olive Oil (Enough to coat the wedges Completely)
2 Tbsp. Brown Sugar (or 1 1/2 Tbsp. honey)
1 tsp. Paprika 
1/2 tsp. Kosher Salt
1/4 tsp. Cayenne Pepper 

Step 1: Preheat oven to 375 degrees. Line a baking sheet with aluminum foil and spray with non-stick spray. 
Step 2: In a medium size bowl toss sweet potatoes with enough olive oil to coat completely (I used about 3 Tbsp.)
Look at all that delicious Beta Carotene!

Step 3: Add brown sugar, paprika, salt, and cayenne pepper to sweet potatoes- stir until fully coated.

Step 4: Put the sweet potatoes on the baking sheet in an even layer. 

Bake about an hour or until golden around the edges and crispy. (I like to flip them about 30 minutes in to get them all over crispity!)
MMM!


Remember if you are enjoying this recipe or any of the others- hit the subscribe button to your right so you can get my recipes straight to your inbox! It will make your tummy growl and your kitchen happy! :-)

Saturday, June 23, 2012

Feta Bruschetta Dip!

I miss my husband a lot today, (if you haven't been following this blog- my husband is deployed overseas currently) I miss him everyday for different reasons of course- but today I miss him a lot because he would love this recipe. I'm definitely making it for him as soon as he gets home. He LOVES bruschetta. If we're at a restaurant and bruschetta is a menu offering- he's ordering it. Every time. We have even stopped going to a certain Italian restaurant because they took bruschetta OFF of their menu. 

I originally saw this recipe on Pinterest the other day pinned from: http://www.memoriesoncloverlane.com/2010/11/recipe-that-will-make-your-life-easier.html 
She calls it "Feta Dip" But I instantly called it Bruschetta dip because that's what it tastes like to me. It was the perfect pairing to the lovely glass of Riesling I enjoyed with it. Mmm. And after my baby brother swooped in the kitchen and devoured the rest of the baguette (no dip, he just ate the bread) I used the leftover dip to make a batch of Fresh Summer Pasta Salad! And that was perfection.

In the original "feta dip" recipe she used green onions, I used chives because I'm really not a fan of oniony flavor (I know, I'm picky). However, if you ARE an onion lover I suggest using green onions, or even some sliced red onion would be beautiful in this- just not for me. :-) This would be such a lovely appetizer to bring to a party, it's beautiful to look at and SOOO tasty. I imagine it would be great on a cracker, pretzel, veggies, etc- but served with the baguette really made it bruschetta like for me.
   
Ingredients:
3 tomatoes, diced (I used Roma tomatoes)
1 bunch of chives, chopped
Olive Oil (approx. 1/4 cup)
6 oz. Feta Cheese, crumbled
3 Tsp. Greek Seasoning
1 Fresh baguette, thinly sliced
 
Step 1: On a beautiful platter (or if you can't find a beautiful platter, like me, a 9x13 glass dish) generously cover the dish in olive oil. I used about 1/4 cup.


Step 2: Cover olive oil with tomatoes and chives.
Step 3: Cover in feta cheese and top with Greek seasoning.
Step 4: Stir together until combined and pretty. :-)
Serve with sliced baguette, dip and fold over the mixture or use a spoon to top your slice. Either way, enjoy! It's delicious. :-)


Mmmmm :-)

 Remember if you are enjoying this recipe or any of the others- hit the subscribe button to your right so you can get my recipes straight to your inbox! It will make your tummy growl and your kitchen happy! :-)


Thursday, June 21, 2012

The best, easiest, frozen Margaritas :-)

So today marks a new day in our relationship, I usually bring you a recipe that will fill your tummy- today I bring you a recipe that will fill your blender with happiness. I love margaritas. LOVE. However, there is a science to making a margarita. A perfect lime to tequila ratio that should not be skewed. I love a margarita on the rocks, but if I'm making them for a crowd in the summertime I always make a frozen batch. They are perfect on a hot summer day. Or any day really. Oh, and this beauty that has been my tried & True recipe for years has only 2 ingredients. 3 if you count the ice. My mom told me last week that it's the best margarita she's ever had. Now I know that's my mother speaking so she's biased, but I've never had a single complaint- but plenty of requests for seconds.

Buyer beware: These puppies are STRONG. It may not taste strong but it is. So take it slowly (unless it's one of those nights where you really need a quick couple of margs, that's understandable just please don't drive afterwards!). And most of all: enjoy :):)


Ingredients: 
1 Can of frozen limeade
1 Can of quality tequila (the empty limeade can, filled with tequila- if you want a weaker drink do a half can. I used Patron for this batch, and that's what I recommend- but any tequila will do (I've used Cabo Wabo & Jose Cuervo with good results)--- very cheap tequila will not taste good though just a warning!)
A couple of cups of ice (Enough to fill the blender)

Step 1: Empty limeade can into blender. Fill empty can with tequila and pour into blender. Fill blender with ice. Blend until smooth. Drink. 
Blend, baby, blend!
Mmm, frozen, tequila goodness!
 Remember if you are enjoying this recipe or any of the others- hit the subscribe button to your right so you can get my recipes straight to your inbox! It will make your tummy growl and your kitchen happy! :-)

Wednesday, June 20, 2012

Oven baked "fried" Chicken Tenders :-)

I am always looking for new chicken recipes. I basically eat chicken 7 days a week... I rarely eat red meat, never eat seafood, and the only pork that goes into my mouth is bacon- but I would never eat a whole strip of bacon (gag) it would have to be involved in something (salad, sandwich, etc). I know, I'm a freak, but with that being said chicken can get super boring. I'm always trying to reinvent it in new and exciting ways. I love chicken tenders, but the traditional fried version just isn't very good for you. I came across this little beauty the other day: http://thewondertwins.blogspot.com/2011/10/mondays-menu-baked-fried-chicken.html

There are all kinds of oven baked chicken tender recipes in the universe, this one came out super flavorful and were a crowd pleaser. Add your choice dipping sauce on the side and you'll be in chicken tender heaven! Also, it comes together very quickly so it's the perfect week night meal. Winner, winner chicken dinner! ;)

Ingredients: 
12 Chicken Tenderloins (I used more than this, and the last bit did not get coated well- I suggest if you're doing more than 12 doubling the coating mixture)
A medium sized bowl of milk (approx 2 cups) 
1/4 Stick of Butter
1/2 tsp. Salt
1 tsp. Seasoned Salt
3/4 tsp. Pepper
2 tsp. Paprika
1 C. Flour

Step 1: Soak chicken tenders in a bowl of milk for 20-30 minutes- I would suggest buttermilk for it's acidity to tenderize, but whatever milk you have on hand is fine. 
Let those chickys soak!

Step 2: Preheat oven to 400 degrees. Put the 1/4 stick of butter in a 9x13 pan and place in the oven to melt the butter. Take out when the butter is melted and set aside.
Buttery goodness...

Step 3: In a gallon size ziploc bag toss salt, seasoned salt, pepper, paprika, and flour. About 3 or 4 at a time, remove chicken strips from milk, shake off excess milk, and toss in the seasoned flour mixture until evenly coated. Place in an even layer in the pan. 
Time to get baked little guys...

Step 4: Bake for 30 minutes or until completely cooked through, flipping once to get both sides crispy. Enjoy!
There it is! Crispity, chickeny, deliciousness! :-)


Remember if you are enjoying this recipe or any of the others- hit the subscribe button to your right so you can get my recipes straight to your inbox! It will make your tummy growl and your kitchen happy! :-)
 

Monday, June 18, 2012

Parmesan Chicken Salad

Today I share with you something fantastic, in fact it is my current obsession. If you read my potato salad post you know that I am a reformed potato salad hater, I am also a reformed chicken salad hater. Say wha? I know, I had horrible picky taste when I was younger, but I've seen the light! This is the perfect summer dish, cool and light- perfect on a cracker or a sandwich, you could even top some fresh greens with it and have yourself a chicken salad salad ;) Oh, I'm on a roll today... But this isn't your traditional onion & celery chicken salad, nope this baby is chock full of Parmesan cheese. Oh yeah, I went there. It's the perfect addition and I don't know why this isn't the traditional chicken salad, but it will be in my house from now on.

I originally was inspired by this post on jenna's journey: (check her out, she's fab!)
http://jennasjourneyblog.blogspot.com/2011/03/parmesan-chicken-salad.html 
Her recipe makes A LOT, so I had to adjust the portions and adapt it to my personal taste, took a bit of tinkering but I got it. I suggest making it in the AM, cover it & let it chill for a few hours before digging in. I usually have to taste a few bites right then and there (guilty), but it's much tastier chilled.


Ingredients:
About 2 cups cooked, shredded chicken (I used pre-cooked grilled, seasoned chicken that I just defrosted and shredded- but any cooked chicken will work)
1/2 C. Mayo
1/4 tsp. Garlic Powder
1/2 tsp. Olive Oil
1 tsp. Lemon Juice
1 Tbsp. Fresh chopped Parsley
1/4-1/2 C. Shredded Parmesan Cheese (Depending on how cheesy/salty you want it)
Pepper to Taste


Step 1: Put shredded chicken in a medium- sized bowl. Add mayo, garlic powder, olive oil, lemon juice, parsley, pepper and shredded cheese. Stir until well combined. Cover and chill in the fridge for a couple of hours and enjoy!

Saturday, June 16, 2012

Powerhouse Green Smoothie!

Alright, you're going to have to trust me for a minute- this smoothie is loaded with spinach but it tastes like a strawberry-banana milkshake. You get all of the benefits of those dark, leafy greens but you don't taste it. Seriously. The color is a bit off-putting, you can cut the green-ness by adding blueberries if you'd like. You really just need to close your eyes and take a sip though, because it's super delicious. If you're on Pinterest (isn't everyone now?) I'm sure you've seen a ton of green smoothie recipes. That's where I saw it first, and I was intrigued. Nick & I decided to whirl one up one Saturday morning and I've never looked back. Never again will I have a sugar-loaded, plain strawberry smoothie in the morning- I load mine up with spinach or kale or whatever dark leafy greens I have on hand to give me extra nutrients! Nutritious and delicious, it's like hiding a salad in a milkshake. 

This is a very basic green smoothie recipe and can be altered in a million different ways. I used frozen strawberries because I needed to use them up, but you can use any kind of berry- frozen or fresh. I like to use vanilla flavored almond milk because it makes it taste creamy and sweet like a milkshake, plus it adds protein, but you could use coconut milk or dairy milk if you prefer. Spinach is the secret ingredient here, but kale also works the same. I like to add ground flax seed if I have it on hand for extra nutrients, chia seeds as well. If you want this smoothie to be your entire breakfast, toss in a 1/2 cup of oats and it will keep you full all morning. 


Ingredients:
1 banana
1/2 Cup frozen sliced strawberries
1/4 Cup Plain Greek yogurt
1 Cup spinach
1 Cup Vanilla flavored almond milk (you may need to add more if it's not blending smoothly)

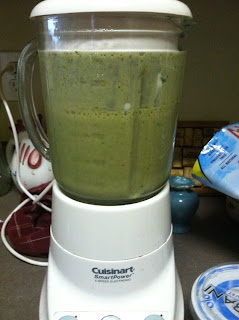
Step 1: Add bananas, berries, yogurt, spinach, and milk to blender. Blend until smooth. Drink up!


Don't get scared by the greens! It's yummy!


Obviously the color isn't super appetizing. Drink it anyway. It's GOOD for you. And it tastes good. 

Wednesday, June 13, 2012

Cinnamon Apple Grilled Cheese!

Let's talk about grilled cheese for a minute- the buttery crispy golden bread, melty cheese combo that we all love. It makes me feel like a kid again, like my mom putting 2 Kraft singles between some white bread and flipping it on the griddle. But I'm not a kid anymore, I want a more adult grilled cheese. This is it. I can't even fully explain to you how great this combo is, I'm just going to recommend that you make it- ASAP. There's something so perfect about the cinnamon raisin bread, apples, and brie combo. They melt together into this buttery, cheesy, perfectness. I use Brie cheese because I love the combo of brie & apples, but it's really good with any kind of cheese- I've made it with cheddar in a pinch and it doesn't come out as beautiful but it still tastes fantastic.

Ingredients: (for 1 sandwich)
Brie Cheese (I used about a quarter of a wedge cut into pieces)
About 6 thin slices of apple (I use granny smith but any apple works)
2 Slices Cinnamon Raisin Bread
1 Tbsp. Butter

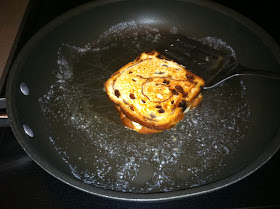
Step 1: Melt butter in a skillet over medium heat. 
Step 2: Lay out the pieces of bread, cover one side with the cheese and the other side with the apple slices. Put 2 sides together and place in the skillet. 


Step 3: Cook first side for about 2 minutes or until golden brown, flip and brown other side, cook until cheese is melted and bread is golden.
Step 4: Cut in half (Or don't) and enjoy! 


Tuesday, June 12, 2012

Bacon & Ranch Potato Salad!

I have a confession to make. Most of my life I have been a potato salad hater. At every BBQ or summer outing I would pass right by the creamy potato deliciousness- not even giving it the time of day. Then about 4 years ago I moved to Little Rock after marrying Nick, and there's the most incredible BBQ restaurant there called the Whole Hog Cafe. The BBQ there is fantastic but what EVERYONE talks about is the potato salad. Does that seem a bit bizarre that the most popular dish in a BBQ restaurant is a side dish? Well it does unless you've tried it. It's the perfect combination of red potatoes, ranch, bacon, creamy sour cream, and seasonings. It's addicting. Needless to say, one bite of the Whole Hog potato salad and I was hooked. I ventured out to other potato salads from there, but the Whole Hog salad will always be my first true love. So when I returned to Florida at the beginning of this summer I didn't miss much about the Natural State, but I missed that dang potato salad. Of course I had to try to replicate it. Now, I'm not promising you that this is THE Whole Hog potato salad but it came pretty close. Close enough to fully fulfill my Whole Hog craving. Now I just need a pulled chicken sandwich and some of that sweet BBQ sauce...


Ingredients: 
3.5 Lbs of Red Skinned Potatoes
1 tsp. Garlic Powder
1 tsp. Black Pepper
2 tsp. Dill 
1 tsp. Kosher Salt
1 T. Sugar
1 Packet Dry Ranch Dressing Mix
1 LB. Bacon, cooked and crumbled
1 1/2 C. Sour Cream
1 1/2 C. Mayonnaise
1 tsp. Balsamic Vinegar
(Note: This may seem like a lot of dressing to you, that's the key in the Whole Hog Potato Salad- lot's of creamy dressing. However, if you're a fan of a salad with less dressing I would start with a cup each of sour cream and mayo and add more to taste)


Step 1: Bake potatoes in a 350 degree oven for about 45 min to an hour, depending on how large your potatoes are, or until cooked through.
Step 2: Cool potatoes slightly and cut into 1/4 inch disks. (You could cube them too).
Step 3: In a separate bowl combine garlic powder, pepper, dill, salt, sugar, ranch mix, bacon, sour cream, mayo, and vinegar. Add to potatoes and stir until combined well. 

Step 4: Cover and chill for a couple of hours- the longer they get to marry with the spices the more flavorful the salad!
 I topped mine with some fresh chopped parsley for a little greenery, I think it'd be great topped with some chives or fresh dill as well. Enjoy!

Sunday, June 10, 2012

Whole Wheat Oatmeal Walnut Pancakes!

I love pancakes. They're light and fluffy and the perfect A.M. treat. What I don't love about pancakes is how you can eat them, and then you're hungry again 30 minutes later. The issue of course is that a traditional pancake lacks fiber and protein. It's time for our pancakes to do more for us! I decided to build a better pancake batter with whole wheat flour, walnuts, and oats. The end result was fantastic, they still came out just like the light and fluffy pancakes I desired- but they were filling and healthy! If you're making these for a crowd that aren't healthy food fans, I suggest not mentioning to them the health factor here. My little brother and his friend gobbled these up, when I told them they were whole wheat walnut oat pancakes they were both surprised- his friend even said "I probably wouldn't have eaten them had I known that, but they were delicious". Winner, winner chicken dinner!

I think these would be great with any kind of nut you may have on hand- pecan, macadamia, etc., and I would love to try them with some blueberries or strawberries or maybe even bananas mixed in! Of course it goes without saying that if you or someone in your family has a nut allergy, just leave those out, they'll still be great.


Ingredients: (Makes about 10 Pancakes depending on how big you make them)
1 1/2 C. Quick Cooking Oats
1/2 C. Whole Wheat Flour
1/2 C. All Purpose Flour
2 Tbsp. Brown Sugar
2 Tsp. Baking Powder
1/4 Tsp. Kosher Salt
1 1/2 C. Milk
2 Eggs
2 Tbsp. Melted Butter
1/2 C. Chopped Walnuts

Step 1: Spray a griddle or large skillet with non-stick spray, heat to medium-high heat. In a large bowl whisk together oats, flours, brown sugar, baking powder, and salt.
Step 2: In a separate bowl whisk together milk, eggs, and melted butter. Stir into dry ingredients until just combined.
Step 3: Fold pecans into batter.

Step 4: Spoon batter by about 1/4 C. onto hot griddle. Cook until little bubbles appear on the top of the pancake, flip and cook until cooked through- about 2 minutes per side.
Note: The batter will be thicker than traditional pancake batter, when I spooned it onto the skillet I spread it out a bit with my spoon to make sure the pancakes didn't get too thick.
Top with butter & syrup - or whatever your favorite pancake toppings may be and enjoy!

Tuesday, June 5, 2012

Chicken Enchiladas in Sour Cream Sauce

These enchiladas are the bomb.com. Seriously. Every time I've made them they've received rave reviews, my mother says that they're like "eating in a restaurant at home". And what's so impressive about that comment is that they are the easiest dish to make! Perfect weeknight meal that everyone will enjoy, even my picky 17 year old brother. In fact my baby brother who doesn't like ANYTHING exotic, or different (hes a burger and fries kinda kid) requested these last night. Made my life.

 I first discovered this recipe at: http://joyful-mommas-kitchen.blogspot.com/2011/09/white-chicken-enchiladas.html and adapted it to my taste. The enchiladas are good, but the sauce is EVERYTHING. I really think I could just eat a bowl of the sour cream sauce by itself. That sounds gross, I realize this, but you can't judge me until you try it!!

Try these, try them tonight, or tomorrow night if you must wait. They will rock your socks. Also, I didn't take as many pictures as I would have liked- because they come together SO quickly, and I was really hungry. So, I apologize. I will probably make them again next week and add more pictures!


 Ingredients:
8 Soft flour tortillas (mine were Fajita style
2 Cups shredded, cooked chicken
2 1/2 Cups shredded Mexican style cheese
3 Tbsp. Butter
3 Tbsp. Flour
2 Cups Chicken broth
1 Cup Sour Cream
1 4 oz. Can green chilies

Step 1: Preheat oven to 350 degrees, grease a casserole dish.
Step 2: Mix shredded chicken and 1 1/2 cups shredded cheese in a bowl. Roll up chicken and cheese mixture in tortillas and place in casserole dish, seam down.
Step 3: In a saute pan melt butter. Whisk in the flour and cook 1 minute. Add chicken broth and whisk until smooth. Heat over medium until thick and bubbly. 
Step 4: Remove pan from heat and whisk in the sour cream and green chilies. Stir until combined and pour sauce over enchiladas in pan. Top with remaining shredded cheese.
Step 5: Bake for 20 minutes and then broil on high for 2 minutes to get cheese lightly browned and bubbly. Let rest for 5 minutes (if you can wait that long!) And enjoy!

Monday, June 4, 2012

Whole Wheat Banana Nut Muffins!

So today's post was supposed to be my famous banana bread recipe, however I am cooking at my mother's currently and I couldn't find a loaf pan. So my banana bread became banana nut muffins! You can adapt this to be made in a loaf pan, just change the cook time to 45 min- 1 hr or until the center has set and a toothpick comes out clean. The muffins still came out terrific, hand held happiness! This is a really great way to introduce family members who may not be so into whole wheat baked goods to a healthier bread. I use a half whole wheat flour- half all purpose flour ratio, but you can certainly go all whole wheat if you're used to a wheatier bread, or all all-purpose if you are too nervous to try the whole wheat(or that's all you have on hand). A quick tip for banana mashing: I put my bananas in a gallon size Ziploc, zip the top, mash with my hands, cut a corner out in the bottom, pipe into the batter mixture, and toss the bag. No mess no stress mashed bananas!
 

Ingredients: (Makes about 18 Muffins or 1 Loaf)
1 C. Whole Wheat Flour
1 C. All Purpose Flour
3/4 t. Baking Soda
1/2 t. Baking Powder
1/2 t. Kosher Salt
1 C. Sugar
1/2 C. Oil (Canola or Vegetable)
2 Eggs
1 t. Vanilla Extract
1/2 C. Milk
3 Medium Bananas Mashed (or 2 large bananas)
1/2 C. Walnuts, chopped

Step 1: Preheat oven to 350 degrees, spray muffin pan with non-stick spray or line with paper liners. In a small bowl mix the flours, baking soda, baking powder, and salt.
Step 2: In a medium bowl beat together the sugar, oil, eggs, and vanilla until combined. Alternately add the flour mixture and the milk in 3 additions. Gently stir in the bananas and nuts.
Step 3: Fill muffin tray 1/2 to 3/4 full.

Step 4: Bake 15-20 min or until a toothpick comes out clean. Let cool, and enjoy! 


MMM! Banana-y, nutty goodness!